In this post I’ll talk about the Obsidian software, what it is, what it uses are, how to set it up and resources to help you further on.
Content
- What is Obsidian
- What can it do for you
- How to set yours up
- Basic filing
- Tips
- Plugins
- Apearance
- Useful markdown bits
- Further resources
What is Obsidian?
Obsidian is an open source software that allows you to organize your knowledge in a very elegant way, view it with clear displays and interconnect it so that your newly acquired data doesn’t get lost in a vortex of information. It works offline so you can access your notes anytime. It’s the best of all worlds, in my opinion.
It uses HTML and the markdown language, but don’t worry, you don’t need to know how to code or program for you to be efficient with this wonderful tool. I don’t know how to code and I managed to do it without shedding tears.
I tweaked my Obsidian’s fonts and colours, but this is how its sidebar menu and note format are like:

This is how the graphic representation looks like, you can zoom it in and out:

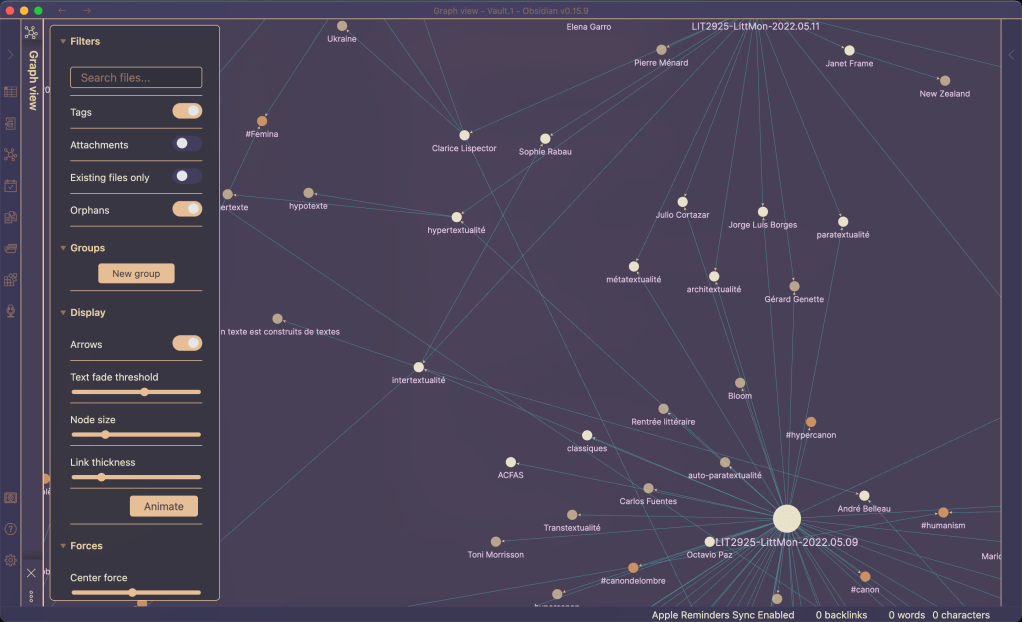
You can see how your knowledge points connect to one another and you can filter by tags to only show specific topics, it’s A-MA-ZING✨🥹
What can it do for you?
☞ I think the previous pictures demonstrate to a large extent the power of Obsidian. But just to clarify:
- It allows you to use tags to organize your notes.
- It allows you to interlink your notes.
- The graphic allows you to visualize those links and connections.
- It’s highly customizable.
- There is a large community built around it, so it’s easy to find templates ready to go and step by step tutorials.
How to set your own
☞ I’m writing the steps I followed to set my own. I’ll do it in three parts. First some basic file organizing tips, second the plugins, third the appearance
Basic filing tips
- First, download the app on their website. It’s also available on iPad and iPone, fantastic for accessing your notes everywhere.
- Once you open Obsidian, create a vault
- Once this is done, you’ll be able to start creating files.
- * I suggest you do the following for organization purposes, but feel free to do it your way *
- Create a single file and name it ‘INDEX‘ to use as a table of content or to link to all your projects
- Create a general folder and give it a name. I call mine ‘Zettlecasten’ and all my notes are automatically generated here. This will avoid having your notes everywhere. The organization will stem from the links between notes and from keywords when I do my search. To do this:
- go to settings, select ‘Files and Links’
- in the ‘Default location for new notes’ select the folder you made
- Create an attachments folder. This is where all attachments (photos, etc.) will be automatically grouped (they will appear in the note where you put them, but Obsidian will store and extract them from here). To do this:
- go to settings, select ‘Files and Links’
- in the ‘Default location for new attachments’ select the folder you made
*Some tips:
- Try to have only one vault
- Try to limit a note to
- a single idea or concept
- a single project
- a single reading report
- a single index
Plugins
☞ Plugins are little programs that you can use to add features like a calendar, a todo list system, reminders, etc.
☞ First you’ll need to enable the plugins.
- Go to your settings and select community plugins on the left menu
- Choose ‘turn on community plugins’
- Start browsing
☞ There is a sea of plugins made by the community, here are the ones I use and recommend.
- Annotator: annotate PDF and EPUB files
- Apple Reminders: for Apple users
- Calendar: a calendar to view your daily notes
- Checklist: you can make your own, but this ones combines them across pages
- Sliding panes: allows to open multiple pages as sliding panes
- Zotero integration: if you’re a data junkie, this one’s for you
- Advanced tables: if you need more control over your tables
☞ When you install them, each comes with its own manual and sometimes a video to show you the steps
Appearance
☞ This is a detail, but I like my notes to look sleek.
☞ The basic way is to :
- go to your settings, choose ‘Appearance’ on the left menu;
- in the ‘Themes’ section, click ‘Manage’ and you’ll be able to access all the themes available;
- I went for the ‘default ’80s Neon’ of Obsidian and then modified it further (Tell me if you’d like a post about that😊).
Useful markdown
☞ Markdown is a language like coding, but its language is more ‘natural’ and lightweight. Here are some markdown bits I found useful.
*Pro tip: your two best friends will be the [[links]] and the #tags
- To link to another note
- [[title of linked note]]
- Create a tag
- make sure there is NO space between the hashtag and the word
- #tag
- To embed a picture or document from your computer to your note
- !
- Italicize
- _italics_
- Make bold
- **bold**
- Change the title level
- # title level
- make sure there is a space between the hashtag and the title otherwise you’ll make a tag
- use one hashtag for level one, two for level two… goes all the way to six
- Nesting another tag in your hashtag
- #nested/tag
- Highlight your text in yellow (other colours will need some coding knowledge)
- ==word==
- Bloc a quote out
- > symbol larger than, followed by a space and your quote
- Make a checklist
- – [ ] write dash, space, bracket, space, bracket, space
- when you press enter after this first line, it will copy the model automatically
- Make your text superscript
- ^ indice
- Strike out the text
- ~~
strike out~~
- ~~
- If you have notes that have a similar theme but a different title, example [[Edgar Allan Poe]] and [[Poe]] you can link them. This way when you search either terms, it will bring out both results.
- the syntax is three dashes, press enter, write the word ‘aliases’, write a colon, square bracket, write the synonym word, a space, a coma if you have more than one synonymous term, a closing square bracket, press enter again, write three dashes. It seems complicated but this is the result:
- —
- aliases : [synonym, synonym, synonym]
- —
- the syntax is three dashes, press enter, write the word ‘aliases’, write a colon, square bracket, write the synonym word, a space, a coma if you have more than one synonymous term, a closing square bracket, press enter again, write three dashes. It seems complicated but this is the result:
Further resources
☞ If you want to know more, here are some YouTube channels and the video I recommend, though feel free to explore on your own.
- Nicole van der Hoeven: How to get started with Obsidian in 2022 – from scratch!
- Artem Kirsanov: My simple note-taking setup | Step-by-step
- Morganeua: The FUN and EFFICIENT note-taking system I use in my PhD
- Bryan Jenks: How Templates in Obsidian Can 100X Your Productivity
- Bryan Jenks: Here Is How I Use Tags And Links In Obsidian to Manage My Zettelkasten
- Linking Your Thinking: Idea Emergence
Recap
→ In this post, you learned how Obsidian can be a powerful tool to organize your knowledge and how you can set it up to start using it effectively.
Questions/Comments
☞ Do you feel more confident starting to use Obsidian now?
☞ Give this post a like if you nerd out when you have a neat system of notes 🤓 ❤︎
☞ Do you prefer a different system than Obsidian? Why?
☞ Tell me if you’d like a post about how to further personalize your Obsidian appearance 👈😊

Leave a comment